History: New Mogre Basic Tutorial 2
Preview of version: 3
|
|
In this tutorial you will be introduced to a few more Ogre/Mogre constructs, expanding on what you have already learned.
|
Prerequisites
- This tutorial assumes you have knowledge of C# programming and are able to setup and compile a Mogre application.
- This tutorial also assumes that you have created a project using the Mogre Wiki Tutorial Framework.
- This tutorial builds on the first tutorial, and it assumes you have already worked through it.
Table of contents
Getting Started
As with the last tutorial, we will be using the Mogre Wiki Tutorial Framework as our starting point. We will add two more methods to our Tutorial class: CreateViewport and CreateCamera. These two methods are virtual methods of the tutorial framework, but in this tutorial we will now look at them to see how Cameras and Viewports are actually created and used.
Add overrides of these methods to your tutorial class:
protected override void CreateCamera()
{
}

protected override void CreateViewports()
{
}
Cameras
A Camera is used to view the scene. A Camera is a special object which works somewhat like a SceneNode does. The Camera object has a Position property, as well as Yaw, Roll, and Pitch methods, and you can optionally attach it to any SceneNode. Just like SceneNodes, a Camera's position is relative to its parents (it's nice to respect one's elders). For all movement and rotation, you can basically consider a Camera a SceneNode.
One thing about Ogre Cameras that is different from what you might expect, is that you should only be using one Camera at a time (for now). In other words, we don't multiple cameras for viewing different portions of the scene and then enabling or disabling to switch between them. Instead the way to accomplish this is to create SceneNodes which act as "camera holders". These SceneNodes simply sit in the scene and point at what the Camera might want to look at. When it is time to display a portion of the Scene, the Camera simply attaches itself to the appropriate SceneNode. We will revisit this technique in the FrameListener tutorial.
Finally, note that we are overriding the tutorial framework's default creation of the camera. If we didn't do that the framework would have created one for us by default.
Creating a camera
First we will be overriding the default camera creation of the framework. Since Cameras are tied to the SceneManager which they reside in, we use the SceneManager object to create them. Find or add an override of the CreateCamera method and add the following code to it:
protected override void CreateCamera()
{
    mCamera = mSceneMgr.CreateCamera("PlayerCam");
}
This creates a Camera with the name "PlayerCam". You can use SceneManager's GetCamera method to get a Camera by its name if you decide not to hold a reference to it. Note that the framework's BaseApplication class provides a property called mCamera that holds the current camera, which is where we assigned the newly created camera object.
The next thing we are going to do is set the position of the Camera and the direction that it's facing. We will be placing objects around the origin, so we'll put the Camera a good distance in the +z direction and have the Camera face the origin. Add the following code to your CreateCamera method:
mCamera.Position = new Vector3(0, 10, 500);
mCamera.LookAt(Vector3.ZERO);
The LookAt method is pretty nifty. You can have the Camera face any position you want to instead of having to Yaw, Rotate, and Pitch your way there. SceneNodes have this function as well, which can make setting Entities facing the right direction much easier in many cases.
Finally we will set a near clipping distance of 5 units. The clipping distance of a Camera specifies how close or far something can be before you no longer see it. Setting the near clipping distance makes it easier to see through Entities on the screen when you are very close to them. The alternative is being so close to an object that it fills the screen and you can't see anything but a tiny portion of it. You can also set the far clipping distance as well. This will stop the engine from rendering anything farther away than the given value. This is primarily used to increase the framerate if you are rendering large amounts of things on the screen for very long distances. To set the near clipping distance, add the following line to your CreateCamera method:
mCamera.NearClipDistance = 5;
You can also change the far clipping distance by setting the FarClipDistance property (though you should not use a far clip distance with Stencil Shadows, which we will be using in this tutorial).
Your final CreateCamera method should look something like this:
protected override void CreateCamera()
{
    mCamera = mSceneMgr.CreateCamera("PlayerCam");
    mCamera.Position = new Vector3(0, 10, 500);
    mCamera.LookAt(Vector3.ZERO);
    mCamera.NearClipDistance = 5;
}
Viewports
When you start dealing with multiple Cameras, the concept of a Viewport class will become much more useful to you. However, we are bringing this topic up now because it is important for you to understand how Ogre decides which Camera to use when rendering a scene. It is possible to have multiple SceneManagers running at the same time or to split the screen up into multiple areas, and have separate cameras render to separate areas on the screen (think of a split view for 2 players in a console game, for example). While it is possible to do these things, we will not be covering how to do them until the advanced tutorials.
To understand how Ogre renders a scene, consider three of Ogre's constructs: the Camera, the SceneManager, and the RenderWindow. The RenderWindow we have not covered, but it is basically the window in which everything is displayed. The SceneManager object creates Cameras to view the scene. You must tell the RenderWindow which Cameras to display on the screen, and what portion of the window to render it in. The area in which you tell the RenderWindow to display the Camera is your Viewport. Under most typical uses of Ogre, you will generally create only one Camera, register the Camera to use the entire RenderWindow, and thus only have one Viewport object.
In this tutorial we will go over how to register the Camera to create the Viewport. We can then use this Viewport object to set the background color of the scene we are rendering.
Creating the viewport
We will be overriding the framework's creation of the viewport. To create the Viewport we simply call the AddViewport method of RenderWindow and supply it with the Camera we are using. Find or add an override of the CreateViewports method and add the following code to it:
Viewport viewport = mWindow.AddViewport(mCamera);
Now that we have our Viewport, what can we do with it? The answer is: not much. The most important thing we can do with it is set the BackgroundColour property to set the background to whatever color we choose. Since we are dealing with lighting in this tutorial we will set the color to black:
viewport.BackgroundColour = ColourValue.Black;
Note that ColourValue expects a red, green, and blue color value for its parameters between the values of 0 and 1.
The last, and most important thing we need to do is to set the aspect ratio of our Camera. If you are using something other than the standard full-window viewport, then failing to set this can result in a very strange looking scene. We will go ahead and set it even though we are using the default aspect ratio:
mCamera.AspectRatio = viewport.ActualWidth / viewport.ActualHeight;
That's all that has to be done for our simple use of the Viewport class.
Your final CreateViewports method should look something like this:
protected override void CreateViewports()
{
    Viewport viewport = mWindow.AddViewport(mCamera);
    viewport.BackgroundColour = ColourValue.Black;
    mCamera.AspectRatio = viewport.ActualWidth / viewport.ActualHeight;
}
At this point you should be able to compile and run the application, though nothing will appear but a blank scene (use the Escape key to exit). Be sure you can run the application without it crashing before continuing.
Lights and Shadows
Ogre currently supports three types of Shadows:
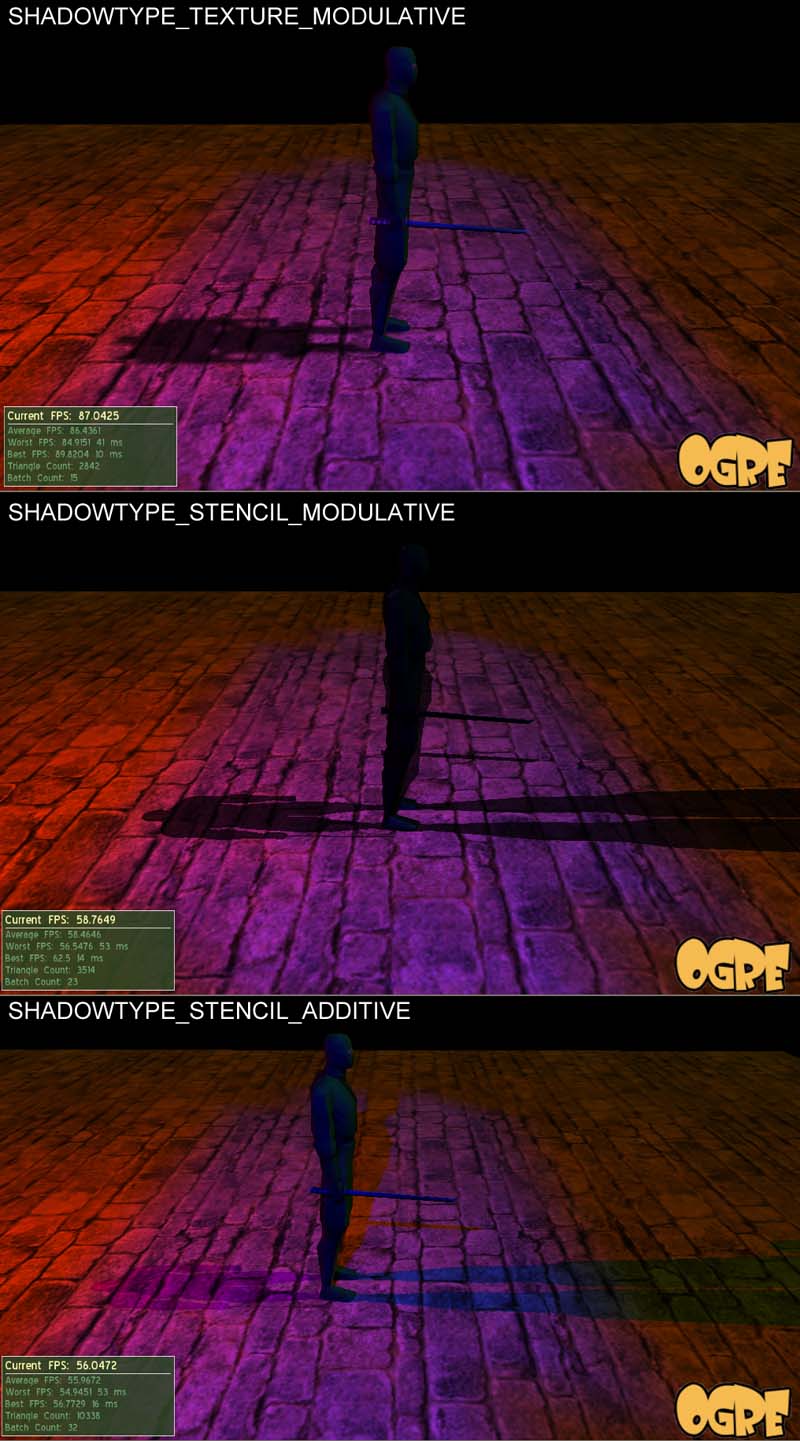
- Modulative Texture Shadows (ShadowTechnique.SHADOWTYPE_TEXTURE_MODULATIVE) - The least computationally expensive of the three. This creates a black and white render-to-texture of shadow casters, which is then applied to the scene.
- Modulative Stencil Shadows (ShadowTechnique.SHADOWTYPE_STENCIL_MODULATIVE) - This technique renders all shadow volumes as a modulation after all non-transparent objects have been rendered to the scene. This is not as intensive as Additive Stencil Shadows, but it is also not as accurate.
- Additive Stencil Shadows (ShadowTechnique.SHADOWTYPE_STENCIL_ADDITIVE) - This technique renders each light as a separate additive pass on the scene. This is very hard on the graphics card because each additional light requires an additional pass at rendering the scene.
Ogre does not support soft shadows as part of the engine. If you want soft shadows you will need to write your own vertex and fragment programs. Note that this is just a quick introduction here - the Ogre manual fully describes shadows in Ogre and the implications of using them.
Using shadows in Ogre/Mogre
Using shadows in Ogre is relatively simple. The SceneManager class has a setShadowTechnique member function that we can use to set the type of Shadows we want. Then whenever you create an Entity, call the setCastShadows function to set whether or not it casts shadows.
We will now set the ambient light to complete darkness, and set the shadow type. Find the BasicTutorial2::createScene member function and add this code to it:
Using shadows in Ogre is relatively simple. The SceneManager class has a ShadowTechnique property that we can use to set the type of Shadows we want. Then whenever you create an Entity, set the CastShadows property to set whether or not it casts shadows.
We will now set the ambient light to complete darkness and then set the shadow type. Add the following code to your CreateScene method:
mSceneMgr.AmbientLight    = ColourValue.Black;
mSceneMgr.ShadowTechnique = ShadowTechnique.SHADOWTYPE_STENCIL_ADDITIVE;
Now the SceneManager uses additive stencil shadows. Lets create an object on the scene and make it cast shadows.
Entity ent = mSceneMgr.CreateEntity("ninja", "ninja.mesh");
ent.CastShadows = true;
mSceneMgr.RootSceneNode.CreateChildSceneNode().AttachObject(ent);