History: Intermediate Tutorial 7
Preview of version: 48
- «
- »
 Any problems you encounter during working with this tutorial should be posted in the Help Forum
 .
.
Table of contents
Introduction
This tutorial covers the basics of rendering to a texture. This technique is used for a variety of effects. It is particularly useful in combination with shaders. Motion blur effects can be created in this way.
The basic idea is rather simple. Instead of just sending render information strictly to our render window, we will also send the information to be rendered directly to a texture in our scene. This texture will then be used like a texture loaded from the hard drive.
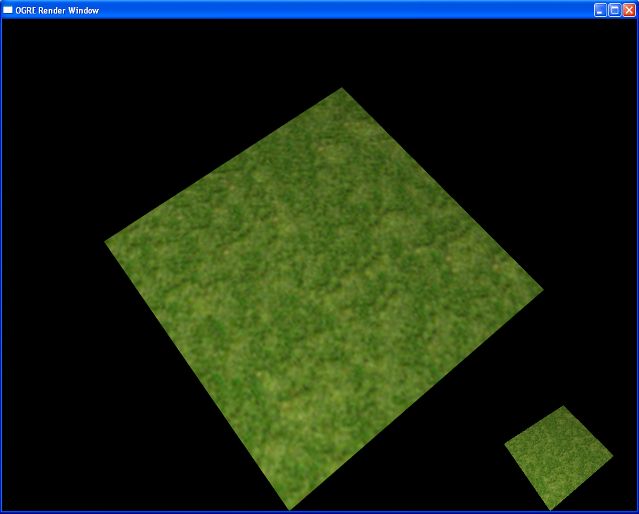
This is the scene we will produce:
The full source for this tutorial is here.
Note: There is also source available for the BaseApplication framework and Ogre 1.7 here.
Setting Up the Scene
First, as usual, we are going to set up a basic scene. Add the following variables to your project.
Ogre::MovablePlane* mPlane;
Ogre::Entity* mPlaneEntity;
Ogre::SceneNode* mPlaneNode;
Ogre::Rectangle2D* mMiniscreen;
Remember to initalize them all in the constructor.
mPlane(0),
mPlaneEntity(0),
mPlaneNode(0),
mMiniscreen(0)
Finally, we'll set up the basic scene elements we need. Add the following to {MONO()createScene{MONO}:
mSceneMgr->setAmbientLight(Ogre::ColourValue(0.2, 0.2, 0.2));

Ogre::Light* light = mSceneMgr->createLight("MainLight");
light->setPosition(20, 80, 50);

mCamera->setPosition(60, 200, 70);
mCamera->lookAt(0,0,0);

Ogre::MaterialPtr mat =
  Ogre::MaterialManager::getSingleton().create(
    "PlaneMat", Ogre::ResourceGroupManager::DEFAULT_RESOURCE_GROUP_NAME);

Ogre::TextureUnitState* tuisTexture =
  mat->getTechnique(0)->getPass(0)->createTextureUnitState("grass_1024.jpg");

mPlane = new Ogre::MovablePlane("Plane");
mPlane->d = 0;
mPlane->normal = Ogre::Vector3::UNIT_Y;

Ogre::MeshManager::getSingleton().createPlane(
  "PlaneMesh",
  Ogre::ResourceGroupManager::DEFAULT_RESOURCE_GROUP_NAME,
  *mPlane,
  120, 120, 1, 1,
  true,
  1, 1, 1,
  Ogre::Vector3::UNIT_Z);
mPlaneEntity = mSceneMgr->createEntity("PlaneMesh");
mPlaneEntity->setMaterialName("PlaneMat");

mPlaneNode = mSceneMgr->getRootSceneNode()->createChildSceneNode();
mPlaneNode->attachObject(mPlaneEntity);
If any of this is confusing, refer to previous tutorials. Compile and run your application. You should see a rotating grass-textured plane.
Creating a Texture
The first step is to create a texture we can render to. Add the folowing to createScene:
Ogre::TexturePtr rttTexture =
  Ogre::TextureManager::getSingleton().createManual(
    "RttTex",
    Ogre::ResourceGroupManager::DEFAULT_RESOURCE_GROUP_NAME,
    Ogre::TEX_TYPE_2D,
    mWindow->getWidth(), mWindow->getHeight(),
    0,
    Ogre::PF_R8G8B8,
    Ogre::TU_RENDERTARGET);
The first parameter of this function is the name to give the texture ("RttTex" is somewhat standard). The second specifies the default resource group. The third specifies the type of the texture to be 2D. The fourth and fifth specify the width and height of the texture. The sixth parameter is the number of mipmaps to be used. The seventh is a texture format, and the last is a usage flag.
There are many different texture formats, but the simplest one is PF_R8G8B8. This produces a 24-bit RGB texture. If you need an alpha channel, then PFR8G8B8A8 will work fine.
Next we need to get the render target of this texture in order to set some parameters. It will also be used later to add a RenderTargetListener.
Ogre::RenderTexture* renderTexture = rttTexture->getBuffer()->getRenderTarget();

renderTexture->addViewport(mCamera);
renderTexture->getViewport(0)->setClearEveryFrame(true);
renderTexture->getViewport(0)->setBackgroundColour(Ogre::ColourValue::Black);
renderTexture->getViewport(0)->setOverlaysEnabled(false);
After retrieving the RenderTexture, we add the camera's viewport to it. This is the viewport that will be rendered to the our texture. We also tell the viewport to clear itself every frame. If we didn't do this, then you would get the infinite trails effect. Try it, it's fun. We also set the background color to black, and we disable overlays so that they won't be rendered on top of our texture.
Writing Our Texture to a File
We are now going to save our texture to a file. RenderTextures are derived from RenderTargets so they already have a function to store their content to a file. Before saving the texture, be sure to update it once.
renderTexture->update();
renderTexture->writeContentsToFile("start.png");
If you compile and run the application now, you will find start.png in the directory that includes your binary executable. It should show the content of your screen.
Note there is also a function called setAutoUpdated which will automatically update the RenderTexture if Ogre's rendering loop or Root::_updateAllRenderTargets is being used. Keep in mind that it does not update the RenderTexture immediately when it is called.
Implementing the Miniscreen
Now we will ad a miniscreen to the upper right corner of our application window. To do this, we'll use a Rectangle2D with our RenderTexture applied to it. Our scene will be shown twice: rendered to our RenderWindow normally, and rendered a second time on to our Rectangle2D. You can use this method to create security camera monitors or computer screens with rendered graphics on them. Of course you don't need to simply replicate the camera's viewpoint. You can attach a different viewport to the RenderTexture, allowing you to do things like remote controlled robots with their own camera that feeds back to a miniscreen. You've probably seen things like this done with stealth games where you can place a small drone on the floor, and then get a view on another room by sending the drone in first and watching its view on a small in-game monitor.
First, we'll setup the Rectangle2D.
mMiniScreen = new Ogre::Rectangle2D(true);
mMiniScreen->setCorners(.5, 1.0, 1.0, .5);
mMiniScreen->setBoundingBox(Ogre::AxisAlignedBox::BOX_INFINITE);
The first line tells the Rectangle2D to generate texture coordinates. These are what we'll use to apply our texture. In the second line we set the coordinates for our miniscreen. These are coordinates that run from the top-left (-1.0, 1.0) to the bottom-right (1.0, -1.0). This places our rectangle in the upper right corner of the screen with a width and height that are equal to 1/4 the screen size. You'll just have to get used to the fact that a number of different coordinate systems are used in graphics programming. It's not a total loss, because understanding simple coordinate transformations like this may help you understand the more complicated transformations you'll see in other areas.
Now that we have the rectangle, we need to attach it to a SceneNode as usual.
Ogre::SceneNode* miniScreenNode =
  mSceneMgr->getRootSceneNode()->createChildSceneNode();

miniScreenNode->attachObject(mMiniScreen);
If you compile and run the application now, you'll see a white rectangle where our texture will soon be.
Creating a Material From Scratch
The next step is now to show the RenderTexture we created in the first section on this rectangle. Therefore we have to create a material for it. We can do this either in a material script, or directly in the code during runtime. In this tutorial, we will use the second method to have everything together in one file.
Ogre::MaterialPtr renderMaterial = Ogre::MaterialManager::getSingleton().create("RttMat", Ogre::ResourceGroupManager::DEFAULT_RESOURCE_GROUP_NAME);
renderMaterial->getTechnique(0)->getPass(0)->setLightingEnabled(false);
renderMaterial->getTechnique(0)->getPass(0)->createTextureUnitState("RttTex");
In the first line we create an empty material and add a technique and a pass in the next two lines. With the third line we disable the lightning to prevent our mini screen from being darker than the actual texture. In the last line we create a new TextureUnitState by passing our created RenderTexture from the first section.
Now we can apply this material to our mini screen.
mMiniScreen->setMaterial("RttMat");
If you run the application now, you will see an undesired effect: The mini screen itself has a miniscreen! To solve this, Ogre introduces RenderTargetListener.
Using a RenderTargetListener
In many cases you will need RTTs with only some scene objects on it. In our case we need a texture that only contains the output of the application window without the mini screen yet on it, as this texture is intended to be applied to our mini screen. So we have to hide the mini screen each time before the window output is stored in our RenderTexture. And this is where the RenderTargetListener comes in.
This listener has two important functions: preRenderTargetUpdate() and postRenderTargetUpdate(). As the names induce, the first function is automatically called by the listener before the RenderTexture is filled (so we can hide our mini screen here) whereas the second function is automatically called after the RenderTexture has been filled (so we can show our mini screen again).
Implementing a RenderTargetListener is quite simple. First of all we let our application class derive from the RenderTargetListener to make it become its own listener. After that we just have to hide and show our mini screen in the pre- and postRenderTargetUpdate() functions. So your application class should basically look like this now:
IntermediateTutorial7.h
class IntermediateTutorial7 : public BaseApplication, public Ogre::RenderTargetListener
{
public:
    IntermediateTutorial7(void);
    virtual ~IntermediateTutorial7(void);

protected:
    virtual void createScene(void);
    virtual void createFrameListener(void);
    virtual bool frameRenderingQueued(const Ogre::FrameEvent& evt);
    virtual void preRenderTargetUpdate(const Ogre::RenderTargetEvent& evt);
    virtual void postRenderTargetUpdate(const Ogre::RenderTargetEvent& evt);

    Ogre::MovablePlane* mPlane;
    Ogre::Entity* mPlaneEnt;
    Ogre::SceneNode* mPlaneNode;
    Ogre::Rectangle2D* mMiniScreen;
};
IntermediateTutorial7.cpp
void IntermediateTutorial7::preRenderTargetUpdate(const Ogre::RenderTargetEvent& evt)
{
	mMiniScreen->setVisible(false);
}

void IntermediateTutorial7::postRenderTargetUpdate(const Ogre::RenderTargetEvent& evt)
{
	mMiniScreen->setVisible(true);
}
Now, the last step we need to do is to add the listener to the RenderTexture. As the application class is derived from RenderTargetListener we can just pass the this pointer as parameter at the end of the createScene function.
renderTexture->addListener(this);
That's it. Now you have a simple mini screen in your app. It's that simple.
Render to Texture and Shaders
As RTTs are often used with shaders, you have to know how to pass the RenderTexture to one. Fortunately, this is really simple.
The most simple case is one where you never change the texture for the shader during runtime. If it remains constant, you just have to tell your material script the name of the texture you create during runtime, in our case "RttTex". So your texture_unit in the material should look like this:
texture_unit
{
     texture RttTex
}
If you need to change the texture the shader should use during runtime, just add the two following lines:
Ogre::MaterialPtr material = Ogre::MaterialManager::getSingleton().getByName("Sepia");
material->getTechnique(0)->getPass(0)->getTextureUnitState(0)->setTextureName("OtherRttTex");
With the first line we get a pointer to the material (in this case here a sepia shader material) where we change the texture name in the second line to the desired one.
Now, as you have set the correct texture name in your material script with one of these two methods, you can access the texture in your cg shader with the following line:
uniform sampler2D SceneSampler : register(s0)
Well, that's it. Your texture of the mini screen should now be passed through your shader and look like this (with the sepia shader attached to this tutorial page):

Exercises
Easy
Intermediate
Difficult
Advanced
Conclusion
These are all the basics you need to know to start with RTT. Now play around a bit with this code and discover a new world of graphical effects.
Full Source
The full source for this tutorial is here.
Next
Move on to the indepth tutorials or start browsing code snippets for further study. Enjoy!
Alias: Intermediate_Tutorial_7