History: Intermediate Tutorial 7
Preview of version: 33
- «
- »
Intermediate Tutorial 7: Render to texture
 Any problems you encounter during working with this tutorial should be posted in the Help Forum
 .
.
Table of contents
Introduction
This tutorial will teach you the basics of rendering to textures. This technique is necessary for a variety of effects especially in combination with shaders, e.g Motion Blur.
The idea behind rendering to textures {LEX()}RTT{LEX} is rather simple. Instead of sending the render output data of your scene to your render window, you just send it to a texture. This texture can then be used just as a normal texture from your harddrive.

You can find the code for this tutorial here.
The Initial Code
Set up your IntermediateTutorial7 application to look like this:
IntermediateTutorial7.h
#ifndef __IntermediateTutorial7_h_
#define __IntermediateTutorial7_h_

#include "BaseApplication.h"

class IntermediateTutorial7 : public BaseApplication
{
public:
    IntermediateTutorial7(void);
    virtual ~IntermediateTutorial7(void);

protected:
    virtual void createScene(void);
    virtual void createFrameListener(void);
    virtual bool frameRenderingQueued(const Ogre::FrameEvent& evt);

    Ogre::MovablePlane* mPlane;
    Ogre::Entity* mPlaneEnt;
    Ogre::SceneNode* mPlaneNode;
    Ogre::Rectangle2D* mMiniScreen;
};

#endif // #ifndef __IntermediateTutorial7_h_
IntermediateTutorial7.cpp
#include "IntermediateTutorial7.h"

//-------------------------------------------------------------------------------------
IntermediateTutorial7::IntermediateTutorial7(void)
{
}
//-------------------------------------------------------------------------------------
IntermediateTutorial7::~IntermediateTutorial7(void)
{
}
//-------------------------------------------------------------------------------------
void IntermediateTutorial7::createScene(void)
{
	mSceneMgr->setAmbientLight(Ogre::ColourValue(0.2f, 0.2f, 0.2f));

	Ogre::Light* light = mSceneMgr->createLight("MainLight");
	light->setPosition(20, 80, 50);

	mCamera->setPosition(60, 200, 70);
	mCamera->lookAt(0,0,0);

	Ogre::MaterialPtr mat = Ogre::MaterialManager::getSingleton().create("PlaneMat", Ogre::ResourceGroupManager::DEFAULT_RESOURCE_GROUP_NAME);
	Ogre::TextureUnitState* tuisTexture = mat->getTechnique(0)->getPass(0)->createTextureUnitState("grass_1024.jpg");

	mPlane = new Ogre::MovablePlane("Plane");
	mPlane->d = 0;
	mPlane->normal = Ogre::Vector3::UNIT_Y;

	Ogre::MeshManager::getSingleton().createPlane("PlaneMesh", Ogre::ResourceGroupManager::DEFAULT_RESOURCE_GROUP_NAME, *mPlane, 120, 120, 1, 1, true, 1, 1, 1, Ogre::Vector3::UNIT_Z);
	mPlaneEnt = mSceneMgr->createEntity("PlaneEntity", "PlaneMesh");
	mPlaneEnt->setMaterialName("PlaneMat");

	mPlaneNode = mSceneMgr->getRootSceneNode()->createChildSceneNode();
	mPlaneNode->attachObject(mPlaneEnt);
}
//-------------------------------------------------------------------------------------
bool IntermediateTutorial7::frameRenderingQueued(const Ogre::FrameEvent& evt)
{
	mPlaneNode->yaw(Ogre::Radian(evt.timeSinceLastFrame));
	return BaseApplication::frameRenderingQueued(evt);
}

//-------------------------------------------------------------------------------------

#if OGRE_PLATFORM == OGRE_PLATFORM_WIN32
#define WIN32_LEAN_AND_MEAN
#include "windows.h"
#endif

#ifdef __cplusplus
extern "C" {
#endif

#if OGRE_PLATFORM == OGRE_PLATFORM_WIN32
    INT WINAPI WinMain( HINSTANCE hInst, HINSTANCE, LPSTR strCmdLine, INT )
#else
    int main(int argc, char *argv[])
#endif
    {
        // Create application object
        IntermediateTutorial7 app;

        try {
            app.go();
        } catch( Ogre::Exception& e ) {
#if OGRE_PLATFORM == OGRE_PLATFORM_WIN32
            MessageBox( NULL, e.getFullDescription().c_str(), "An exception has occured!", MB_OK | MB_ICONERROR | MB_TASKMODAL);
#else
            std::cerr << "An exception has occured: " <<
                e.getFullDescription().c_str() << std::endl;
#endif
        }

        return 0;
    }

#ifdef __cplusplus
}
#endif
Compile and run this program before continuing. You should see a simple plane rotating around the Y-axis.

Render to texture
Creating the render textures
First of all, we need to create a texture. Add this code at the end of the createScene function:
Ogre::TexturePtr rtt_texture = Ogre::TextureManager::getSingleton().createManual("RttTex", Ogre::ResourceGroupManager::DEFAULT_RESOURCE_GROUP_NAME, Ogre::TEX_TYPE_2D, mWindow->getWidth(), mWindow->getHeight(), 0, Ogre::PF_R8G8B8, Ogre::TU_RENDERTARGET);
("mWindow" is your Ogre::RenderWindow pointer)
The first parameter to createManual() is the name of the texture, which is commonly named RttTex. The second specifies the resource group, the third the texture type (in our case a 2D texture), the fourth and the fifth the width and height of the texture. You also have to pass the number of mip maps you want as well as the texture format and a usage flag. Concerning the texture format: There are many different ones, but the most simple is the PF_R8G8B8 which will create a 24-bit RGB-texture. If you are in the need of an alpha channel, PF_R8G8B8A8 should suit best for this.
Now we need to get the render target of this texture in order to set some parameters and later also add a RenderTargetListener.
Ogre::RenderTexture *renderTexture = rtt_texture->getBuffer()->getRenderTarget();

renderTexture->addViewport(mCamera);
renderTexture->getViewport(0)->setClearEveryFrame(true);
renderTexture->getViewport(0)->setBackgroundColour(Ogre::ColourValue::Black);
renderTexture->getViewport(0)->setOverlaysEnabled(false);
After getting the render texture, we have to add a viewport to it. This is the viewport with whose content the RenderTexture will be filled. We also tell the viewport to clear itself every frame, set the background color to black and request to disable all the overlays for the texture as we don't want to have them on it.
Write texture to file
At this point we've got everything ready to do a first check: We just store the content of our created RenderTexture in a file. The handy thing is that the RenderTextures are derived from RenderTarget and so have a ready function to store the content of the texture in a file (as well as we can do it with RenderWindows). But before saving the content to a file, you should update your RenderTexture. You can do this manually via the update() function.
renderTexture->update();

// Now save the contents
renderTexture->writeContentsToFile("start.png");
After running the application, you will find a new .png file in the directory your .exe is in, that should show the content of your screen (in our case the textured plane).
Note that there's also setAutoUpdated() which will automatically update the RenderTexture if Ogre's rendering loop or Root::_updateAllRenderTargets is being used.
Keep in mind that it doesn't update the RenderTexture immediately when it's called.
For example:
// Don't add this code!
renderTexture->setAutoUpdated(true);
Implementing a mini screen
General
Now, we will add a mini screen in the lower right corner of our application window. To do this we'll add a Rectangle2D to our scene which will get our RenderTexture as texture. Our scene will be shown twice: one time rendered to the RenderWindow as normal, and a second time as the texture on our Rectangle2D.
Using this method it is also possible to implement TV screens (or CCTV cameras, etc). You can display other parts of your level by putting a camera there, creating a RenderTexture (as described in the first section) and displaying it on the TV screen.
Setting up the rectangle
Creating an Ogre::Rectangle2D is rather simple:
mMiniScreen = new Ogre::Rectangle2D(true);
mMiniScreen->setCorners(0.5f, -0.5f, 1.0f, -1.0f);
mMiniScreen->setBoundingBox(Ogre::AxisAlignedBox(-100000.0f * Ogre::Vector3::UNIT_SCALE, 100000.0f * Ogre::Vector3::UNIT_SCALE));
In the first line, we set the parameter to true to generate texture coordinates, which we later need to map the texture on the rectangle. In the second line we have to specify the corners of the rectangle. Left is -1.0 and right +1.0, top is +1.0 and bottom -1.0. So our rectangle is just in the lower right corner of our application window.
We also give the rectangle a real huge bounding box to prevent it from being culled when we are not facing its scene node. You could also use AxisAlignedBox::setInfinite(), instead of manually setting the size of the box, but there have been some problems with this in the past, so manually setting a huge box should be the safest way.
Now that we have created the rectangle, we just need to attach it to a SceneNode which should not be anything new for you.
Ogre::SceneNode* miniScreenNode = mSceneMgr->getRootSceneNode()->createChildSceneNode("MiniScreenNode");
miniScreenNode->attachObject(mMiniScreen);
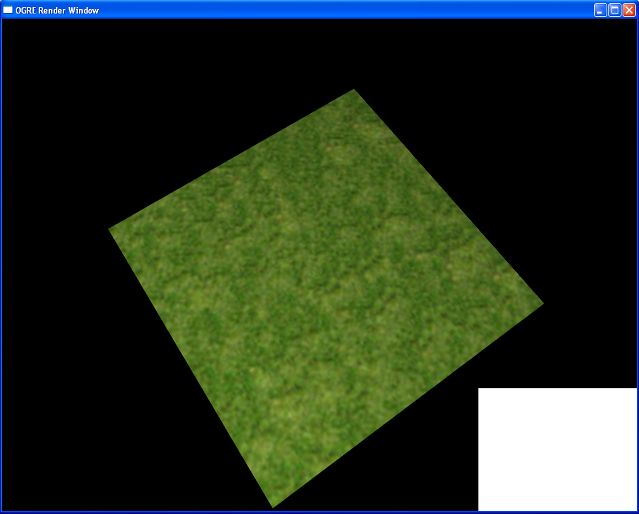
If you run the application at this stage, you will see a white rectangle in the lower right corner of our application window.
Creating a material from scratch
The next step is now to show the RenderTexture we created in the first section on this rectangle. Therefore we have to create a material for it. We can do this either in a material script, or directly in the code during runtime. In this tutorial, we will use the second method to have everything together in one file.
Ogre::MaterialPtr renderMaterial = Ogre::MaterialManager::getSingleton().create("RttMat", Ogre::ResourceGroupManager::DEFAULT_RESOURCE_GROUP_NAME);
renderMaterial->getTechnique(0)->getPass(0)->setLightingEnabled(false);
renderMaterial->getTechnique(0)->getPass(0)->createTextureUnitState("RttTex");
In the first line we create an empty material and add a technique and a pass in the next two lines. With the third line we disable the lightning to prevent our mini screen from being darker than the actual texture. In the last line we create a new TextureUnitState by passing our created RenderTexture from the first section.
Now we can apply this material to our mini screen.
mMiniScreen->setMaterial("RttMat");
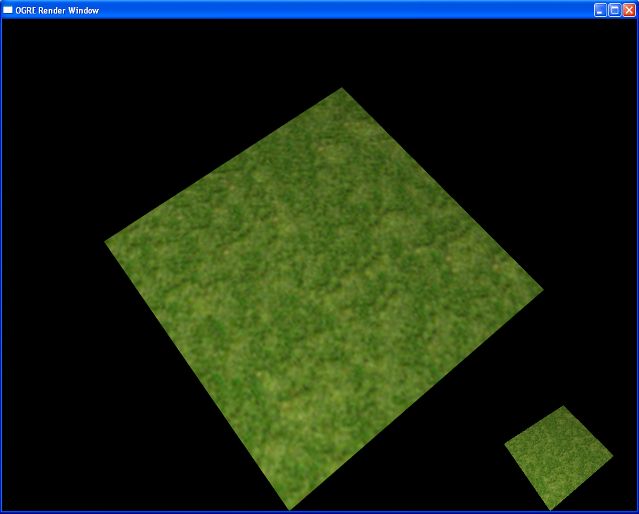
If you run the application now, you will see an undesired effect: The mini screen itself has a miniscreen! To solve this, Ogre introduces RenderTargetListener.
Usage of RenderTargetListener
General
In many cases you will need RTTs with only some scene objects on it. In our case we need a texture that only contains the output of the application window without the mini screen yet on it, as this texture is intended to be applied to our mini screen. So we have to hide the mini screen each time before the window output is stored in our RenderTexture. And this is where the RenderTargetListener comes in.
This listener has two important functions: preRenderTargetUpdate() and postRenderTargetUpdate(). As the names induce, the first function is automatically called by the listener before the RenderTexture is filled (so we can hide our mini screen here) whereas the second function is automatically called after the RenderTexture has been filled (so we can show our mini screen again).
Implementing a RenderTargetListener
Implementing a RenderTargetListener is quite simple. First of all we let our application class derive from the RenderTargetListener to make it become its own listener. After that we just have to hide and show our mini screen in the pre- and postRenderTargetUpdate() functions. So your application class should basically look like this now:
IntermediateTutorial7.h
class IntermediateTutorial7 : public BaseApplication, public Ogre::RenderTargetListener
{
public:
    IntermediateTutorial7(void);
    virtual ~IntermediateTutorial7(void);

protected:
    virtual void createScene(void);
    virtual void createFrameListener(void);
    virtual bool frameRenderingQueued(const Ogre::FrameEvent& evt);
    virtual void preRenderTargetUpdate(const Ogre::RenderTargetEvent& evt);
    virtual void postRenderTargetUpdate(const Ogre::RenderTargetEvent& evt);

    Ogre::MovablePlane* mPlane;
    Ogre::Entity* mPlaneEnt;
    Ogre::SceneNode* mPlaneNode;
    Ogre::Rectangle2D* mMiniScreen;
};
IntermediateTutorial7.cpp
void IntermediateTutorial7::preRenderTargetUpdate(const Ogre::RenderTargetEvent& evt)
{
	mMiniScreen->setVisible(false);
}

void IntermediateTutorial7::postRenderTargetUpdate(const Ogre::RenderTargetEvent& evt)
{
	mMiniScreen->setVisible(true);
}
Now, the last step we need to do is to add the listener to the RenderTexture. As the application class is derived from RenderTargetListener we can just pass the this pointer as parameter at the end of the createScene function.
renderTexture->addListener(this);
That's it. Now you have a simple mini screen in your app. It's that simple.
RTTs and shaders
Passing an RTT to a shader
As RTTs are often used with shaders, you have to know how to pass the RenderTexture to one. Fortunately, this is really simple.
The most simple case is one where you never change the texture for the shader during runtime. If it remains constant, you just have to tell your material script the name of the texture you create during runtime, in our case "RttTex". So your texture_unit in the material should look like this:
texture_unit
{
     texture RttTex
}
If you need to change the texture the shader should use during runtime, just add the two following lines:
Ogre::MaterialPtr material = Ogre::MaterialManager::getSingleton().getByName("Sepia");
material->getTechnique(0)->getPass(0)->getTextureUnitState(0)->setTextureName("OtherRttTex");
With the first line we get a pointer to the material (in this case here a sepia shader material) where we change the texture name in the second line to the desired one.
Now, as you have set the correct texture name in your material script with one of these two methods, you can access the texture in your cg shader with the following line:
uniform sampler2D SceneSampler : register(s0)
Well, that's it. Your texture of the mini screen should now be passed through your shader and look like this (with the sepia shader attached to this tutorial page):
Conclusion
These are all the basics you need to know to start with RTT. Now play around a bit with this code and discover a new world of graphical effects.
Alias: Intermediate_Tutorial_7